
Visualising your workload with a personal kanban
Why visualise your workload?
Why visualise work? And what is Kanban anyway? You’ve got loads to do right? So much so that adding work to help you do the work could be the final straw? I’d hazard a guess you don’t even know how much work you have lurking about. This post is about visualising the work you have on the go and providing a system for limiting how many plates you spin at once to give the space to concentrate on what’s important.
If you work in a manufacturing plant workload can be easily visualised. Raw materials come in and widgets go out. The things being worked on at any time are the widgets in production at any of the workstations plus the queues of waiting work in progress. The jobs not yet started are captured in the stack of waiting orders and the potential future work is the leads the sales teams are trying to close. The Phoenix Project highlights that these techniques can work beyond manufacturing. The phoenix project is a great book, based on another great book, The Goal by Eliyahu M. Goldratt (am I geeking out too much on fave books here?).
Kanban is Japanese for sign board and it traces back to Taiichi Ohno and the revolutionary Toyota production system that transformed modern manufacturing. Knowledge work was a term coined by the management legend Peter Drucker (way back in 1957) to describe people who think and create from their mind rather than crank out widgets. Knowledge workers are workers whose main capital is knowledge. Examples include software engineers, physicians, pharmacists, architects, engineers, scientists, public accountants, lawyers, and academics, whose job is to “think for a living”. Knowledge work is hard to visualise. If you are working on a marketing campaign or a software programme how do you know you are 25%, 50% or 75% complete? In manufacturing if a workstation is not working at the required throughput you can see work pile up at that station, email inboxes aside there is not the same stacking up in knowledge work.
I first considered using agile approaches for non-software projects when I discovered some people are using agile techniques for things like managing their family life. It might have been this TED talk that sparked the idea. One of my challenges is overcommitting, always with good intentions but occasionally with unintended impacts. I needed a way of tracking all the things I am working on, all the things I am waiting on and all the stuff I might soon need to work on. For me it was not so much the here and now I wasn’t taking account of as the big commitments that would soon be coming up. So I started using kanban to manage myself. This had two powerful benefits – (1) I could see all the things I was working on, (2) I could constrain what I was currently focusing on. Switching tasks is cognitively expensive, even more so if you have a poor working memory and need to recap on where you were every time you resume a task. Multi-tasking is a myth – more so if you are dyslexic. I didn’t realise Personal Kanban and Kanban for 1 were actually “things” until I started researching for this post – there is even a book (which I’ve not read but now plan to). My advice differs slightly from the official Personal Kanban advice, but the principle are the same. I encourage you to tailor it to meet your needs.
6 Steps to Productivity
Step 1: Create your personal kanban board
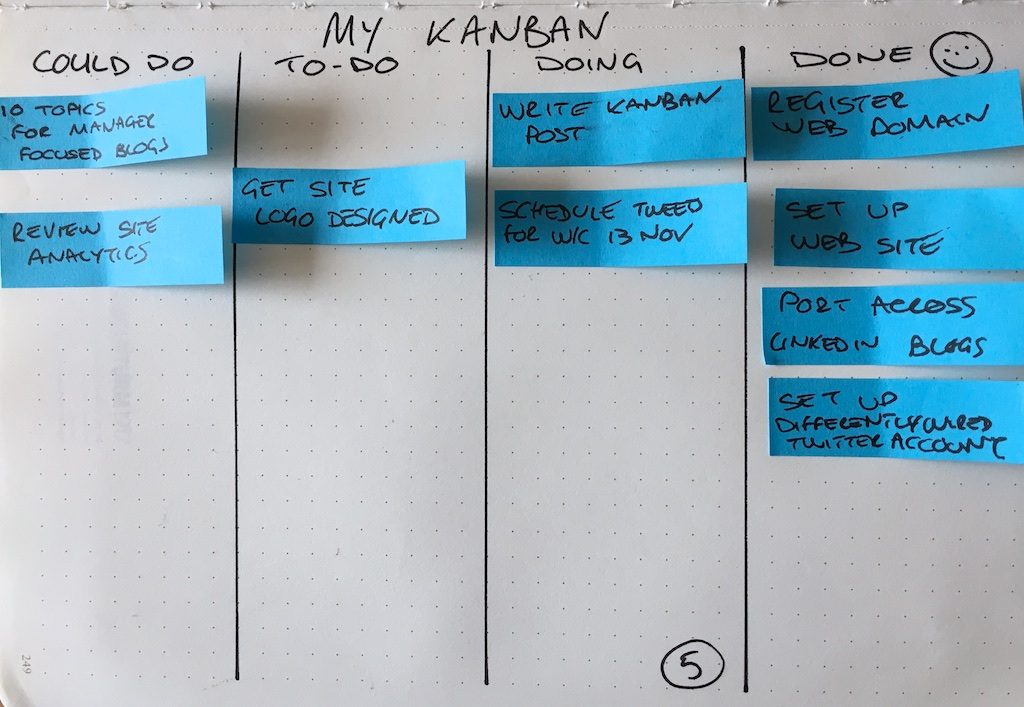
A page in your notebook will do. An A3 board would be better, a bigger board offers more space. This is the easy bit. The pic at the top of the post is my suggested starter board. Tick off this section as complete and brace yourself for the hard bit.
Step 2: Capture all the could do’s
Due to my habit of over committing I break the “backlog” down into could do and to-do. Capturing everything you are working on. Everything – tasks big and small. This will be an uncomfortable experience. There will likely be a lot of it. Putting each item on a post it (other sticky notes are available) will create a big pile. I like the thin sticky notes used for page marking. Buy the paper ones, not the plastic ones. If your kanban is in your notebook or journal then there is an additional constraint of only being able to fit so many possible work thing post-its on the page.
Step 3: Prioritise the to do’s
Go through the “could do” notes – which ones are a priority now? Move them to the to do. Are there any that realistically you are not going to get done? If so let people know so it’s not surprising. People don’t like surprises. Once you are comfortable with the system I’d recommend putting a limit on the to-do work pile but not yet.
Step 4: Determine a suitable Work In Progress (WIP) limit.
WIP is the constraint that drives the kanban system. I suggest 5 items. How many things can you concurrently work on? Depending on the sort of work you do and how granular the task breakdown is you may need a smaller number or a bigger one. The goal is to have a small WIP number to minimise task switching. Below 3 you may stall. As the number gets bigger the benefits of having reduced WIP and using kanban are reduced.
Step 5: Begin the flow
Pull a task from the “to-do” section of your kanban board into “doing” section and start working on it. You can pull multiple tasks into doing so long as there are fewer tasks in doing than your self-imposed WIP limit. I need you to imagine here an animated gif of a whiteboard with post-it notes moving around and a huge backlog of tasks turning into a huge collection of completed work. If you are a talented graphic designer happy to work for “exposure” don’t stop at imagining this drop me a mail with your interpretation 🙂
Step 6: Get stuff done
When a task is complete move it from doing to done and smile. Kanban is helping you manage your work. Repeat step 5.
The catch
You can’t have more tasks (post-its) in the doing section than the WIP limit. If you have a WIP of 5 and 5 tasks in the doing and a must do lands on your desk you must finish one of the doing to create the space to work on the new thing.
Building on from the basics
Visualising work using kanban will build an appreciation of how many things you are working on, how long things take to complete, what tasks you are prone to start but linger in an unfinished state – perhaps the things you should do but don’t want to. It helps with prioritisation of work and reduces over commitment. If you are using a time chunking technique like Pomodoro you can count the time slots used to see how long common tasks take you. Use this information as a basis for estimating other tasks. For me, with my dyslexic/dyspraxic memory, it is a great way of not forgetting all the things in the backlog. It also frees my brain up from having to think about unrelated things while trying to focus on a task.
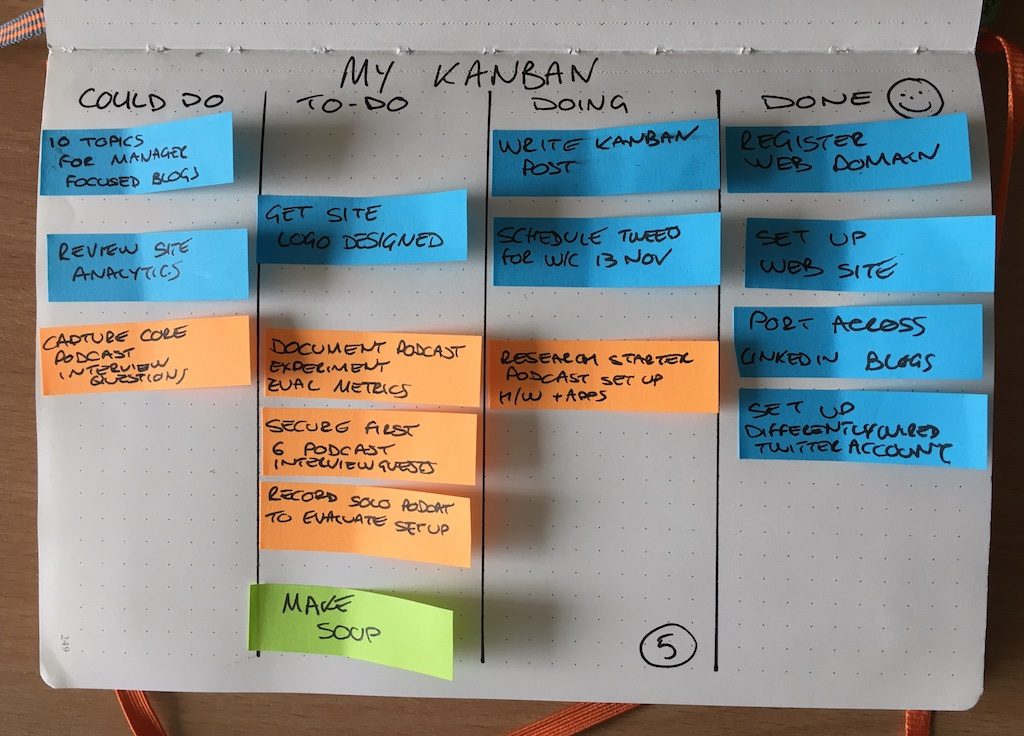
Once you get the basic kanban system up and running and you have arrived at a comfortable yet challenging WIP limit I suggest adding a waiting-on section at the bottom. Any stalled tasks waiting on things from others can be parked here to avoid workflow from artificially stalling. Be careful not to use this to game the system. A further enhancement can be introducing value streams. This can start as simple as separate rows for different types of tasks and grow to be as customised as different defined work stages (columns) for those types of activity. For example, a web post might start in the backlog as a concept or title, progress to an outline stage, then a first draft, a review, a media added stage, a final review, a scheduled for publishing all before a final published state. A simple example of this with different types of work depicted by different colours is shown below.
From here it is a simple case of monitor, adapt and improve. The aim is not to have a perfect tool but for the tool to help you get more of the right work done.
A final caveat: if you get really good at estimating task durations and using this to plan your work do not aim for 100% utilisation. Do not use this to plan to be busy for 8 hours of the working day. There is fascinating research into throughput of motorways and computer network when the throughput exceeds about 75% of the theoretical capacity. In short, the actual throughput drops. If you try to schedule your whole day the same will happen. The aim is not to be busy all the time, the goal is to be effective.
Pingback: Bringing focus to the scatty mind - Differently Wired
Pingback: How I write this blog – Differently Wired
Pingback: Managing workload and priorities with a journal – Differently Wired